One of the ultimate winter delicacy of the versatile and robust Punjabi cuisine, Pinni is a delicious sweet made of simple and basic ingredients like whole wheat flour (atta), sugar, ghee, nuts and some flavorings. As funny as it sounds, one of the reasons this sweet is called so, is the fact that it is round in shape. Follow this Pinni Recipe of mine, make it at home and enjoy it with your family and friends. Not just a treat for your taste buds, this sweet provides a good source of energy and essential nutrients to your body as well.
What is Pinni
Pinni is a traditional sweet from Punjab, a state in North India. Made with whole wheat flour or atta, dry fruits and nuts, sugar, ghee (clarified butter) and optional edible gum (gond in Hindi), it is one of those desserts or sweets that is perfect for the winters.
A typical Atta Pinni Recipe includes a well roasted golden atta mixture that is shaped into oblong or round balls and stored in air-tight jars.
As much as it is loved during the winter season, it is also a well-known and beloved treat prepared during festivals and special occasions as well.
Because of the ingredients like ghee, dry fruits and nuts that are believed to provide warmth and energy during the cold season, Pinni is a favorite sweet during the chilly season, not just in Punjab but also other parts of North India.
While the basic ingredients of a Pinni Recipe have the ones listed above, different regions of Punjab and other states may have their own unique variations.
These variations could include differences in ingredients, proportions and preparation methods, adding to the diversity of this sweet.
Some recipes may include ingredients like sesame seeds, poppy seeds, coconut and different types of nuts, adding unique flavors and textures. It can also not only be made with atta, but also with types of lentil flours, millet flours and ground seeds & nuts powders.
You can combine these flours and powders with whole wheat flour as well. All in all, you absolutely must give this recipe a try, if you are a lover of all things sweet and lovely.
About This Pinni Recipe
In this post, I’ve shared our family Pinni Recipe, similar to Atta Ladoo but with the addition of edible gum (gond). Feel free to explore the Gond Laddu recipe on the blog as well.
We do make this sweet in bulk (and even Panjiri) to be enjoyed throughout the cold winter months. However, for the blog, I made the same recipe with less proportions.
To make this Pinni recipe, an absolute essential ingredient that you require is atta, which is ground whole wheat flour used to make roti or chapati (flatbread), in the Indian subcontinent.
Here, you must keep in mind that this atta is different from the whole wheat flour available in countries outside India.
Atta is made with hard or semi-hard durum wheat that is ground with the help of stone grinders. On the contrary, the western whole wheat flour is usually made with red wheat that is softer as compared to durum wheat and ground using steel rollers.
Also, in the Pinni Recipe of our household, edible gum or gond is added. This unique and special ingredient, along with the crushed nuts, gives a nice crunch to the sweet. However, you can opt to omit the edible gum in case of non-availability or if you do not wish to add.
Make sure that you are using desi ghee to make the recipe of Pinni. Although, the sweeteners can be of your choice. We always use khand (unrefined sugar) or powdered sugar.
You can opt to use jaggery or coconut sugar or palm sugar or powder the regular white sugar and add instead. Whichever sweetener you use, add according to taste.
One of the most common spice flavorings in a Pinni Recipe is that of green cardamom powder. Even, I add it along with dried ginger powder (saunth). You can choose to skip both these, if you wish to.
How to make Pinni
Prep Gond & Nuts
1. Place a heavy bottomed kadai (wok) or frying pan on medium to medium-high heat and add 3 tablespoons desi ghee in it. Ensure the ghee reaches around 180 degrees Celsius for optimal frying of gond (edible gum).
If the temperature is too low, the gond won’t puff up and may remain raw. Add a small piece of gond to test; it should puff up immediately.
When the ghee is moderately hot, add 2 tablespoons gond and begin to fry.
2. Fry the gond pieces till they puff up and achieve a light golden color, ensuring they are well and evenly fried. Keep stirring continuously for uniform results.
3. Ensure that the gond is thoroughly fried with a light golden color and puffed well.
It’s crucial to avoid any raw, uncooked center, as this firm, uncooked part may adhere to the teeth during consumption.
4. Use a slotted spoon to remove the fried gond and place them on kitchen paper towels, allowing excess ghee to drain.
5. Lower the heat to low or medium-low, add 2 tablespoons almonds and fry for one minute or so until there’s a noticeable change in color. If necessary, you can increase the heat to medium.
Use a slotted spoon to take out the almonds and place them on kitchen paper towels to drain.
6. Fry 2 to 3 tablespoons cashews until they achieve a light brown or golden color.
If necessary, increase the heat to medium and adjust the time accordingly. Once done, remove them and place on kitchen paper towels to drain.
7. Next, fry 2 tablespoons pistachios for about a minute or until their color changes to light golden.
8. Turn off the heat. Subsequently, remove the pistachios and place them on kitchen paper towels to drain.
Placing the fried nuts on kitchen paper towels serves the purpose of absorbing any excess ghee, ensuring that the nuts are well-drained and ready for the next steps in this recipe.
Powder Gond & Nuts
9. Allow the fried gond and nuts to cool. Once they reach room temperature, you can grind them.
Optionally, the gond can be powdered using a mixer-grinder, blender, mortar-pestle, rolling pin, or the back of a small steel bowl or glass. Crush the gond on a plate with a steel bowl until finely powdered.
Alternatively, you can use the small chutney grinder of your mixer-grinder, similar to what I do, to finely powder the gond.
Transfer the fried gond to the mixer-grinder. Powder it finely and set aside.
When grinding, it’s essential not to grind continuously. Instead, pulse in short spurts of a few seconds.
You can also utilize the pulse option on your mixer-grinder. Remember to scrape the sides intermittently and grind in short bursts to achieve a fine powder consistency.
This method helps prevent overheating and ensures that the fried gond is ground finely without compromising its quality.
10. In the same grinder, add the fried almonds, cashews and pistachios.
11. Grind the nuts, and this time too in short intervals to get a coarse or semi-fine texture.
Feel free to grind it to a finer consistency, if that’s your preference.
12. Sift 0.75 cup/ ¾ cup of powdered sugar to remove lumps. Set aside.
Sifting powdered sugar aids in eliminating small blocks or lumps of sugar that may not blend well with the roasted flour. This step ensures a smoother and more homogeneous mixture.
Roast Whole Wheat Flour
13. Approximately ½ tablespoon of ghee will be present in the pan or kadai after frying the nuts.
Heat the kadai over medium-low flame or medium flame, allowing the ghee to become warm or reach a lightly hot temperature. Add 1 cup whole wheat flour afterwards.
14. Mix so that it thoroughly combines with the ghee.
15. Roast the flour for 8 to 10 minutes or until fragrant. In the picture below, you can see how the flour appears after roasting for 8 minutes.
The duration for roasting the flour may vary depending on factors such as the material, size and thickness of the pan.
In my case, I used a steel kadai without a thick-bottomed base, and it took approximately 8 minutes to achieve the desired level of roasting.
It’s essential to be attentive to these variables to ensure the flour is roasted to the desired extent.
16. Now, add 4 tablespoons desi ghee.
17. Mix the ghee thoroughly with the flour.
18. Continue stirring and roasting the mixture for 4 to 6 minutes more. Keep in mind that the timing may vary depending on elements such as the material, size, volume, and thickness of the frying pan or kadai (wok).
In my case, using a steel kadai, it took about 6 minutes to complete this roasting step. Adjust the duration accordingly to achieve the desired texture and flavor.
You can evaluate the doneness using your senses. Look for an even golden brown color and inhale the fragrant nutty aroma of the roasted whole wheat flour.
These cues will help you determine when the flour has reached the desired level of roasting as shown in the picture below.
Also, check the taste of the whole wheat flour; it should exhibit a cooked nutty flavor without any hints of rawness.
This step ensures that the flour is thoroughly cooked which contributes to the overall quality of this traditional sweet.
The total roasting time for the flour varies approximately between 12 to 16 minutes, depending on factors such as flour texture, quality, pan thickness, and material type.
19. Turn off the heat and place the kadai (wok) on your kitchen countertop. Add the powdered gond & nuts, 1 tablespoon raisins, sifted powdered sugar, ½ teaspoon cardamom powder and ½ teaspoon ginger powder.
20. Mix thoroughly with a spoon to get an even mixture.
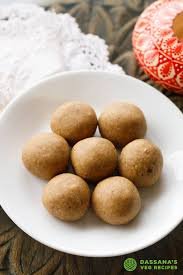
21. While still hot, shape portions of the mixture into round Pinnis. While I’ve rolled them into a ladoo form, you have the option to press the portion in your fist to create small oblong or cylindrical shapes, which will bear the impression of your fingers.
If the heat becomes intolerable, wait for a few minutes. It’s important not to risk burning your hands. Remember, once the mixture cools, shaping becomes difficult as the mixture becomes hard.
If forming tidy round balls proves difficult and the mixture is crumbling, incorporate a few additional tablespoons of warm ghee. Mix thoroughly and then proceed to form the round balls.
22. Serve Pinni or store at room temperature in an air-tight container.
These keep well for a months, especially during the cold winters of North India. Storing in an air-tight container helps preserve its freshness and prevents it from becoming overly dry.